Emulate a complete Aarch64 embedded Linux system using Yocto and QEMU
Using Yocto to build simplest Linux distro for Aarch64 and emulating the system with QEMU.
1. Objective
- Build your own Linux distro and meta layer.
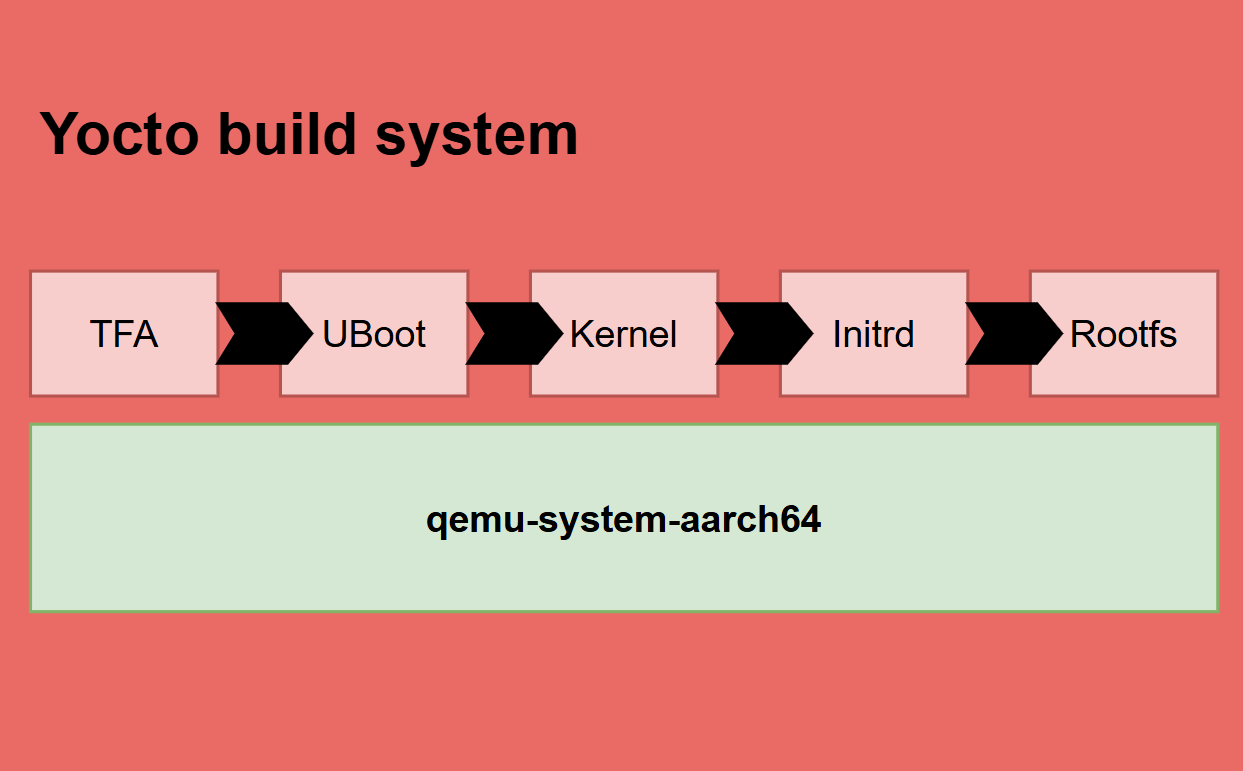
- Understand how all the components in an Aarch64 Linux machine work together: ARM trusted firmware, u-boot, kernel, device tree, initrd, rootfs.
- Writing custom recipes for each components, and building from local sources, make learning, developing, and testing be more convenient.
- Keep the layer as simple as possible.
- Target platform will be the
qemu-system-aarch64 virtmachine.
Full source is now available on Github.
2. Setting up the simplest build system
Normally, to set up a Yocto build system, we clone Poky, as a collection that contains a lot of metadata, recipes, tools, machines, examples, etc. That might not be necessary for every system. So instead of clone full the repo, we take only necessary components:
bitbake– Of course, the core engine to setup and build the system.openembedded-core– Only openembedded-core is needed, this layer contains core recipes, bbclass to build components, inherit that, we don’t have to rewrite everything.
One external layer that is need when building aarch64 Linux distro is meta-arm. This layer contains main components for building images for ARM machines.
meta-arm-toolchain– Very basic component, At least we need that to build, right 😛? this contains recipe to get corresponding arm cross-toolchains: compiler, linker, debugger, etc, for your ARM architecture.meta-arm– We can reuse some stuffs to build trusted-firmware-a instead of writing all tasks from the scratch.
2.1. About our layer
To keep things as simple as possible, our layer contains:
- 1 distro:
lava-distro. - 1 machine:
lava-machine. - And few recipes that build components from local sources.
The layer structure looks like this:
1
2
3
4
5
6
7
8
9
10
11
12
13
14
15
16
17
18
19
20
21
meta-lava/
├── classes
│   └── lava_src.bbclass
├── conf
│   ├── distro
│   │   └── lava-distro.conf
│   ├── layer.conf
│   └── machine
│       ├── include
│       └── lava-machine.conf
├── README.md
├── recipes-bsp
│   ├── tfa
│   └── u-boot
├── recipes-core
│   └── images
├── recipes-kernel
│   └── linux
└── wic
    ├── lava-extlinux.cfg
    └── lava.wks
The recipes-bsp contains bsp recipes such as building trusted-firmware-a (TFA), u-boot. recipes-core contains recipes for building images. wic is a tool to build the final rootfs. recipes-kernel to build kernel and so on. We’ll dig into each component later.
Note that, I choose the name is with the prefix lava- that normally should indicate a company or a product name, you can change the name to whatever you want.
2.2. Setup build directory
Using kas setup tool is a better than using bitbake itself to setup build environment. This tool reads the configuration file, auto clone and checkout bitbake layers, and initialize bitbake build process.
1
2
3
4
5
6
7
8
9
10
11
12
13
14
15
16
17
18
19
20
21
22
23
24
25
26
header:
  version: 1
machine: lava-machine
distro: lava-distro
target:
  - lava-image
repos:
  bitbake:
    url: "https://git.openembedded.org/bitbake"
    branch: "2.0"
    layers:
      .: excluded
  openembedded-core:
    url: "https://git.openembedded.org/openembedded-core"
    branch: kirkstone
    layers:
      meta:
  meta-arm:
    url: "git://git.yoctoproject.org/meta-arm"
    branch: kirkstone
    layers:
      meta-arm-toolchain:
      meta-arm:
  meta-lava:
    layers:
      meta-lava:
The kas tool read this file, the machine lava-machine and distro lava-distro are selected. The target for building system is lava-image recipe. External layers also are listed under repos configuration. For example, we take the repo https://git.openembedded.org/openembedded-core and take only the meta layer. These layer paths will be included in the bblayers.conf automatically.
The .: excluded here for bitbake means we only want to clone bitbake tool without including any layer from repo.
So just setup build directory, checkout repos by running command kas checkout or start a full build directly with kas build command. No need to checkout repos manually or source environment file, etc.
2.2. Setup repositories
Some open source repositories, I prefer to build from local more than cloning over network every time. Using Yocto SCR_URI point to a git repo might be inconvenient if you’re developing, testing, changing and rebuilding the source code a lot, you don’t want to write patches, or make commits every time right 😛? Also sometimes, you want to keep those repositories as a part of your project, like building SDK, BSP, etc. It’s more convenient if you keep them in local.
Because of that, I keep repos: trusted-firmware-a, u-boot, kernel in local and Let Yocto point to them. In the very first time setting up your dev environment, you can clone those repositories by using git submodule git submodule update --init:
1
2
3
4
5
6
7
8
9
10
[submodule "meta-lava/recipes-kernel/linux/files/linux-6.14.2"]
  path = meta-lava/recipes-kernel/linux/files/linux-6.14.2
  url = https://github.com/torvalds/linux.git
[submodule "meta-lava/recipes-bsp/u-boot/files/u-boot"]
  path = meta-lava/recipes-bsp/u-boot/files/u-boot
  url = https://github.com/u-boot/u-boot
[submodule "meta-lava/recipes-bsp/tfa/files/arm-trusted-firmware"]
  path = meta-lava/recipes-bsp/tfa/files/arm-trusted-firmware
  url = https://github.com/ARM-software/arm-trusted-firmware.git
  branch = v2.9-rc1
Or if you already have your repositories, you can change those submodule yourself.
3. BSP layer
The BSP contains everything to bring the board up, it’s not too complex to setup when our board is actually QEMU platform that is already supported by almost open source embedded projects. One part of the BSP is bootloader, to emulate a complete boot flow, I prefer using combination of trusted-firmware-a and u-boot. The boot process will start execution from flash memory, running at EL3 by TFA and end up at EL1 with u-boot and kernel.
3.1. Trusted Firmware A
TFA has supported qemu as a build platform. The meta-arm layer contains helpful include file recipes-bsp/trusted-firmware-a/trusted-firmware-a.inc to build tfa from source. To use this include file, there are some important variables to note:
1
2
3
4
TFA_PLATFORM = "qemu"
TFA_BUILD_TARGET = "all fip"
TFA_INSTALL_TARGET = "flash.bin"
EXTRA_OEMAKE:append:pn-lava-tfa = " BL33=${DEPLOY_DIR_IMAGE}/u-boot.bin"
The TFA_PLATFORM specify build platform, the TFA_INSTALL_TARGET specify final target that we want to make it into the image deploy folder.
The fip image here indicates a package that includes all stuffs will loaded by BL1. They are BL2, BL31, BL32 (Optional), and BL33 non-secure world application. To understand more about the TF-A bootflow, you can visit the main tfa document. A quick summary here is, the BL1 should be run right when ROM code start running, the fip image should be in a fixed memory location, BL1 will take care loading them into RAM and passing control.
The BL33 here, in our case, is u-boot, and to build fip image, we have to specify BL33 binary BL33=${DEPLOY_DIR_IMAGE}/u-boot.bin.
A simple recipe to build our TFA:
1
2
3
4
5
6
7
8
9
10
11
12
require recipes-bsp/trusted-firmware-a/trusted-firmware-a.inc

// ...

SRC_URI = "file://arm-trusted-firmware"

// ...

do_compile:append:lava-machine() {
    dd if=${BUILD_DIR}/bl1.bin of=${BUILD_DIR}/flash.bin bs=4096 conv=notrunc
    dd if=${BUILD_DIR}/fip.bin of=${BUILD_DIR}/flash.bin seek=64 bs=4096 conv=notrunc
}
Note that, the TFA have no idea about our memory, in our case, QEMU flash memory. QEMU has supported running with a boot rom code image using the -bios <image> option. What we do is, an append job after compiling, concatenate bl1.bin and fip.bin to create the boot ROM flash.bin image.
If you’re confusing about Exception Level and how Aarch64 work in the very early stage, I have other blog discuss about writing an [Aarch64 bare metal bootloader/posts/aarch64-bare-metal-boot-code/).
3.2. U-boot
Similar like TFA, u-boot has supported QEMU platform, for various architecture: x86, arm, risc, etc. The default config for Aarch64 is qemu_arm64_defconfig. With QEMU, u-boot assumes that it will be started at ROM start 0x00000000, that’s true, but only if u-boot runs alone. In our case, tfa firmware BL1 will be run first, and tfa by default will load BL33 at 0x60000000 and pass the control. So we have to change u-boot entry point, the text base config CONFIG_TEXT_BASE.
The openembedded-core/meta layer has supported building u-boot by the include file recipes-bsp/u-boot/u-boot.inc. There’re some important variables used by this include file, for example, UBOOT_MACHINE = "qemu_arm64_defconfig" that specific default configuration file. If you have a new config file for your board, it’s better if you can write a patch to apply your new config file.
In our case, to change the config CONFIG_TEXT_BASE, don’t have to write a whole new config file, or a patch for that. The OE u-boot.inc include file has supported merging config files. To apply your configs, create a config file with extension .cfg and adding to build system by SRC_URI += "file://u-boot_tfa.cfg", the file will be merged into .config file automatically by do_configure(). So we make a simple config file that changes our text base address:
1
CONFIG_TEXT_BASE=0x60000000
To setup booting environment for u-boot, by default, QEMU uses bootflow as the boot command (CONFIG_BOOTCOMMAND="bootflow scan -lb"). Quick explanation for this command is perform scan devices and -b boot if possible. This command depends on the boot_targets variable that lists devices to scan by u-boot. The boot_targets has been defined in the file board/emulation/qemu-arm/qemu-arm.env.
I have a blog detail about setting u-boot environment variables, take a look u-boot environment.
1
2
3
4
5
6
/* SPDX-License-Identifier: GPL-2.0+ */

/* environment for qemu-arm and qemu-arm64 */

/* ... */
boot_targets=qfw usb scsi virtio nvme dhcp
The order now priority qfw, usb, sata, virtio, and so on. I prefer using a block device that contains our boot and rootfs partitions, so I change the order into mmc usb virtio scsi qfw nvme dhcp, by apply a patch. The priority order now scan mmc, usb, virtio interfaces first, and so on.
Ok, and now building the u-boot.bin, the binary will be used by lava-tfa recipe to make the flash.bin ROM image.
3.3. Kernel
Not too much things to discuss here, the kernel is very generic, just build a version with ARCH=arm64. The final image Image, that is specified by KERNEL_IMAGETYPE=Image, under /arch/arm64/boot/ folder, will be copy into our deploy folder and move into our boot partition.
You’re free to change the source code, add drivers, whatever you want, and then, rebuild the lava-kernel recipe.
3.4. Devicetree
We are using QEMU as a platform, the QEMU has generated its own device tree binary. Now we have two choices:
- Dumb the device tree to a separated file and let u-boot load it into memory.
- Let’s QEMU load the to memory by default, the memory address for device tree also is passed to u-boot via the built-in env variables.
I refer option 2, because no one understand QEMU platform’s hardware than itself 😛. But in case you want to change the devicetree, or just simple dumb it and load it again. To dumb devicetree:
1
qemu-system-aarch64 -machine virt -machine dumpdtb=qemu-non-secure.dtb
Note that, we are running system from EL3, some resources are secured and cannot be accessed by the kernel or uboot. Kernel might crash if it try to access to some secure resources. so it’s better to dump the device tree in secure version.
1
qemu-system-aarch64 -machine virt,virtualization=on,secure=on -machine dumpdtb=qemu-secure.dtb
In case you to change the device tree, convert into device tree source (dts), change the value and then convert back into dtb.
1
2
3
4
5
dtc -I dtb -O dts qemu-secure.dtb -o qemu-secure.dts

# Change device tree value.

dtc -O dtb -I dts qemu-secure.dts -o qemu-secure.dtb
And then you can write a custom recipe to place device tree into boot partition, let uboot load it into memory.
4. Core layer
The core layer contains recipes to build our final images: rootfs and initrd.
4.1. Initrd
Initrd taking care mounting and switching into the real rootfs. It’s only useful if your rootfs is complicated to mount, the job cannot done by the kernel itself, and need other stuff to do it. For example, the rootfs is encrypted, we don’t want hardcoding in kernel, or the rootfs requires extra modules, drivers to load, etc. It’s where the initrd is needed.
The lava-initrd recipe is taking care building initrd image. The filesystem is kept simple with basic directories: /bin, /sbin, /etc, /proc, /sys, /usr/bin, /usr/sbin, /dev, /lib, /var/log, /var/run/. Along with some basic device nodes:
1
2
3
4
5
6
7
8
9
10
11
12
13
14
15
16
17
18
19
20
do_install() {
  # ...
  mkdir -p ${INITRD_INSTALL_DIR}/proc
  mkdir -p ${INITRD_INSTALL_DIR}/etc
  mkdir -p ${INITRD_INSTALL_DIR}/sys
  mkdir -p ${INITRD_INSTALL_DIR}/dev
  mkdir -p ${INITRD_INSTALL_DIR}/lib
  mkdir -p ${INITRD_INSTALL_DIR}/var/log
  mkdir -p ${INITRD_INSTALL_DIR}/var/run
  mkdir -p ${INITRD_INSTALL_DIR}/var/run
  mkdir -p ${INITRD_INSTALL_DIR}/etc/init.d

  mknod -m 660 ${INITRD_INSTALL_DIR}/dev/mem c 1 1
  mknod -m 660 ${INITRD_INSTALL_DIR}/dev/tty2 c 4 2
  mknod -m 660 ${INITRD_INSTALL_DIR}/dev/tty3 c 4 3
  mknod -m 660 ${INITRD_INSTALL_DIR}/dev/tty4 c 4 4
  mknod -m 660 ${INITRD_INSTALL_DIR}/dev/null c 1 3
  mknod -m 660 ${INITRD_INSTALL_DIR}/dev/zero c 1 5
  # ...
}
To build utility binaries, nothing easier than using busybox. The recipe also has built busybox for arm and install into the initrd image. The kernel will mount temp initrd into RAM and execute the /init program. I write a simple bash /init program to mount the real rootfs.
Now to load the real rootfs, we have to know which block device interface the rootfs lies on and which partition index. In our case, we will emulate a virtio block device. And the real rootfs is partition 2 (The first one is boot partition). So in the /init program I try to make a virtual disk device node /dev/vda2, mount it into a temp directory and switch rootfs exec switch_root . "/sbin/init". Note that switching rootfs must be done by init program (PID 1). switch_root command here switch to our real rootfs / that is mounted with /dev/vda2 and then execute /sbin/init under new rootfs. The switch_root also help you to clean the initrd image on RAM. The /init program:
1
2
3
4
5
6
7
8
9
10
11
12
13
14
15
16
17
18
19
20
21
22
23
24
25
26
27
28
29
30
31
32
33
34
35
36
37
38
39
40
41
42
43
44
45
46
47
48
#!/bin/sh

ROOT="/mnt/.rootfs"
DISK_DEVICE="/dev/vda"
PARTITION="2"
ROOT_DEV=${DISK_DEVICE}${PARTITION}

mount_real_fs() {
    echo "Pid: $$ mounting ${ROOT_DEV} to ${ROOT}!"

    if [[ "$$" -ne 1 ]] ; then
        echo "Must be run as PID 1!"
        return
    fi

    [ -d ${ROOT} ] || mkdir -p ${ROOT}
    [ -d ${ROOT_DEV} ] || mknod ${ROOT_DEV} b 254 ${PARTITION}

    mount ${ROOT_DEV} ${ROOT}

    cd ${ROOT}

    echo "Switching to rootfs, bye!"
    exec switch_root . "/sbin/init"
}

open_console() {
    exec /bin/sh +m
}

mount -t sysfs none /sys
mount -t proc none /proc

count=2
while [ $count -ge 0 ]
do
    if read -r -t 1; then
        open_console
    else
        echo -ne "Press Enter to active initrd console: ${count}\r"
        count=$(( $count - 1 ))
    fi
done

mount_real_fs

# If can't mount real rootfs, we active the console. Never exit from a init program.
open_console
I do an extra step here is run a counter 2 seconds, in case user want to enter initrd shell without mounting a real rootfs.
Note that /init is supposed that NEVER return, kernel will panic if you do that 😛. So it’s better to open_console with sh cmd interface, so that you can check the errors, what’s going on, why your rootfs can not be switched, etc.
Other blog that discusses everything about initrd here.
4.2. Rootfs image
Now the QEMU has supported emulating a block device, mmc, usb, virtio, and more. But we have to make an image first to use them. Assume our block devices we have 2 partitions inside, boot and rootfs.
- The boot partition contains Kernel, initrd image and the boot config file:
syslinux.conf. - The rootfs, of course, this is our main working space.
Building this image is done by the lava-image recipe. To make a minimal one, we inherit from openembedded-core core-image.bbclass, that provide basic functions to create the images. One more important component is used by openembedded-core is wic tool. This tool generate images by reading configurations from a Kickstart file (.wks), for more detail about visit OpenEmbedded Kickstart (.wks) Reference. We make a simple wks file to describe our system:
1
2
3
4
bootloader --ptable=gpt --configfile="lava-extlinux.cfg"

part /boot --ondisk=vda --align 64 --size=100M --active --source bootimg-partition --fstype=ext4 --label boot --sourceparams="loader=u-boot"
part /     --ondisk=vda                                 --source rootfs            --fstype=ext4 --label root
The wks file is specified by the WKS_FILE = "lava.wks" variable. And which files to put into boot partition is specified by IMAGE_BOOT_FILES +="${KERNEL_IMAGETYPE} ${INITRD_IMAGE}" variable. We take 2 files Image and lava-initrd.cpio.gz from deploy folder into boot partition.
Here we create 2 partitions for our image boot and root, both are ext4 filesystem type and lie on a virt disk image device. The source here tells wic which plugin interface is used to build the partition, for example, if the plugin is rootfs means, the partition will be mounted into part <mount_point> mount point. If the plugin is bootimg-partition, and the param loader=u-boot, by default, wic will generate a boot configuration file extlinux/extlinux.conf that follow the syslinux standard. In our case, we specify our boot config file lava-extlinux.cfg via the option --configfile, wic will add this into extlinux/extlinux.conf in boot partition:
1
2
3
4
LABEL EmbeddedOS Lava
  KERNEL ../Image
  INITRD ../lava-initrd.cpio.gz
  APPEND root=/dev/mem rootwait rw
KERNEL indicates kernel filename, similar for INITRD, and APPEND indicate kernel command line. When booting system, uboot will search for each partition, look for this file and try to boot with those information, kernel, initrd, kernel command line. In error cases, for example, this file can not be found, is in invalid format, or can not load components, etc. U-boot stops and scans for other devices in the list.
Note that, the default user is root without password, to login to the rootfs, we need to append more features: IMAGE_FEATURES = "allow-empty-password allow-root-login empty-root-password".
After building the final image,
wicprovide command lines to quick valid it, for examplewic ls your_image.wic 1that lists all files in the partition 1. Check thewictool manual.
5. Setup QEMU platform
Openembedded-core also supports a class qemuboot.bbclass that provides interface to build the runqemu utility. I have configured QEMU options into a separated file lava-qemu.inc that is included into our machine config.
1
2
3
4
5
6
7
8
9
10
11
12
13
14
15
16
# 1. Select qemuboot.bbclass to build `runqemu`.
IMAGE_CLASSES += "qemuboot"

# 2. QEMU machine configuration.
QB_SYSTEM_NAME = "qemu-system-aarch64"
QB_MACHINE = "-machine virt,secure=on,virtualization=on"
QB_CPU = "-cpu cortex-a57"
QB_MEM = "-m 2048"

QB_DEFAULT_FSTYPE = "wic.qcow2"
QB_FSINFO = "wic:no-kernel-in-fs"

QB_ROOTFS_OPT = "-drive id=disk0,file=@ROOTFS@,if=none,format=qcow2 -device virtio-blk-device,drive=disk0"
QB_DEFAULT_BIOS = "flash.bin"

# More config ...
Some important configs like QB_MACHINE, because we are running at EL3, it’s important to enable secure monitor and hypervisor layer in QEMU. QB_MEM the memory should be big enough to load components, for example, BL1 load fip image, u-boot load kernel, etc. QB_ROOTFS_OPT this option emulate a virtio block device, and the image will be our rootfs image.
6. Running complete system
Full the build system now are available on this repo: Arm64 emulation build system.
In early stage, clone external repos to local:
1
git submodule update --init
This command will clone tfa, u-boot, kernel, into local. If you want this to point to your sources, change the submodules, or copy your sources into corresponding directories.
Now we using kas to clone yocto components, and build:
1
2
kas checkout
kas build
That’s it! for building, now the images are available. To run the system with runqemu tool, we need to source environment first and then run:
1
2
source openembedded-core/oe-init-build-env
runqemu nographic
Ok, now our system’s running with full components. Trusted firmware run first:
1
2
3
4
5
6
7
8
9
10
11
12
13
14
15
16
17
18
19
20
21
22
23
24
25
26
27
28
29
NOTICE:  Booting Trusted Firmware
NOTICE:  BL1: v2.9(debug):
NOTICE:  BL1: Built : 09:51:25, Apr 21 2025
INFO:    BL1: RAM 0xe0ee000 - 0xe0f6000
INFO:    BL1: Loading BL2
INFO:    Loading image id=1 at address 0xe06b000
INFO:    Image id=1 loaded: 0xe06b000 - 0xe073201
NOTICE:  BL1: Booting BL2
INFO:    Entry point address = 0xe06b000
INFO:    SPSR = 0x3c5
NOTICE:  BL2: v2.9(debug):
NOTICE:  BL2: Built : 09:51:25, Apr 21 2025
INFO:    BL2: Doing platform setup
INFO:    BL2: Loading image id 3
INFO:    Loading image id=3 at address 0xe0a0000
INFO:    Image id=3 loaded: 0xe0a0000 - 0xe0ac0a4
INFO:    BL2: Loading image id 5
INFO:    Loading image id=5 at address 0x60000000
INFO:    Image id=5 loaded: 0x60000000 - 0x60119a28
NOTICE:  BL1: Booting BL31
INFO:    Entry point address = 0xe0a0000
INFO:    SPSR = 0x3cd
NOTICE:  BL31: v2.9(debug):
NOTICE:  BL31: Built : 09:51:25, Apr 21 2025
INFO:    ARM GICv2 driver initialized
INFO:    BL31: Initializing runtime services
INFO:    BL31: Preparing for EL3 exit to normal world
INFO:    Entry point address = 0x60000000
INFO:    SPSR = 0x3c9
And then u-boot:
1
2
3
4
5
6
7
8
9
10
11
12
13
14
15
16
17
18
19
20
21
22
U-Boot 2025.04-rc5 (Apr 21 2025 - 09:51:31 +0000)

DRAM:  2 GiB
Core:  51 devices, 14 uclasses, devicetree: board
Flash: 32 MiB
Loading Environment from Flash...

...

Scanning bootdev 'virtio-blk#31.bootdev':
  1  extlinux     ready   virtio       1  virtio-blk#31.bootdev.par /extlinux/extlinux.conf
** Booting bootflow 'virtio-blk#31.bootdev.part_1' with extlinux
1:      EmbeddedOS Lava
Retrieving file: /extlinux/../Image
Retrieving file: /extlinux/../lava-initrd.cpio.gz
append: root=/dev/mem rootwait rw
## Flattened Device Tree blob at 40000000
   Booting using the fdt blob at 0x40000000
Working FDT set to 40000000
   Loading Ramdisk to bd004000, end bd640d6f ... OK
   Loading Device Tree to 00000000bcffe000, end 00000000bd00304c ... OK
Working FDT set to bcffe000
Kernel:
1
2
3
4
5
6
7
8
9
10
11
Starting kernel ...

[    0.000000] Booting Linux on physical CPU 0x0000000000 [0x411fd070]
[    0.000000] Linux version 6.14.0 (oe-user@oe-host) (aarch64-oe-linux-gcc (GCC) 11.5.0, GNU ld (GNU Binutils) 2.38.20220708) #1 SMP PREEMPT Mon Apr 21 09:51:54 UTC 2025
[    0.000000] KASLR enabled
[    0.000000] Machine model: linux,dummy-virt

...

[    2.182577] Freeing unused kernel memory: 10624K
[    2.184727] Run /init as init process
Initrd:
1
2
3
Hello Lava initrd!
Pid: 1 mounting /dev/vda2 to /mnt/.rootfs!
Switching to rootfs, bye!
And finally, our rootfs:
1
2
3
4
EmbeddedOS Lava 1.0 lava-machine /dev/ttyAMA0

lava-machine login: root
root@lava-machine:~#
That’s all for this topic! bye for now 😛.